



Pizza napoletana, often called Neapolitan or Napolitana pizza in English, comes from Naples in Campania. This version wears the Margherita topping: tomato, fior di latte, basil and olive oil. The goal is a thin, tender centre and a light, resilient raised edge, the cornicione. A little softness under the topping is welcome; a gummy band of raw dough is not.
The useful secrets are measurable: choose flour for the fermentation and oven, control dough temperature, let the dough relax, keep gas in the rim, drain the cheese and heat the baking surface thoroughly. More yeast, more water and more black spots do not automatically make a better pizza.
Yield: four approximately 255 g dough balls, each making one 28–30 cm pizza; one pizza per serving. The main method uses a direct dough, meaning all dough ingredients are mixed together without a separate preferment. It requires a steady 20°C / 68°F proofing place. A refrigerator alternative is given below for warmer kitchens.
Choose the flour before mixing
Use an Italian tipo 00 flour specifically formulated for Neapolitan pizza, with approximately W 260–280 strength and 12–13% protein. A practical reference is Caputo Pizzeria, whose manufacturer lists 12.5% protein and W 260–280. Choose by the product name and technical sheet; bag colours vary by market.
The number 00 describes the refined flour type, not its gluten strength. A 00 pastry flour and a 00 pizza flour can behave very differently. W measures dough strength through a laboratory test; protein on a supermarket label is only a rough guide. If a specification gives P/L, around 0.5–0.7 is a useful balance of stretch and resistance for this style.
For this 60%-hydration dough, avoid very weak pastry flour, self-raising flour, or extremely strong Manitoba flour as a straight replacement. Very strong flour can stay stubbornly elastic on this schedule. Do not add vital wheat gluten just to chase a high protein number.
Household-oven option: a white bread or pizza flour around 12–13% protein is a workable substitute and may brown more readily during a longer bake. Its absorption and elasticity will differ. Start with the same water and use the texture cues below. For the closest match to the main method in a high-heat pizza oven, use the specified Neapolitan pizza flour.
Ingredients
Direct dough: four pizzas
- 🌾 625 g tipo 00 Neapolitan pizza flour
- 💧 375 g drinking water, weighed
- 🧂 18.8 g fine sea salt
- 🍞 0.30 g instant dry baker's yeast, or 0.90 g fresh compressed baker's yeast
- 🌾 Up to 20 g additional flour for dusting
Use one form of yeast, not both. Start with water around 18–20°C / 64–68°F and adjust its temperature to reach the finished-dough target in step 3. The dusting allowance covers the box, bench and peel; shake off most of it.
The baker's percentages are 100% flour, 60% water, 3% salt (rounded), and 0.048% instant yeast. Flour is always the reference weight. There is no oil, sugar, milk or malt in this dough. The olive oil below is a topping.
Margherita topping: four pizzas
- 🍅 280 g canned peeled tomatoes with some of their juice
- 🧂 2 g fine sea salt for the sauce
- 🧀 280 g fior di latte, weighed after draining
- 🌿 12 medium fresh basil leaves, about 4 g
- 🫒 20 g extra virgin olive oil
Good San Marzano tomatoes work well; keep enough juice for a loose, spoonable sauce. Reduce the sauce salt if the tomatoes are already salted. Buy about 350 g fior di latte to allow for whey loss when draining.
Per pizza: 70 g tomatoes, about 0.5 g sauce salt, 70 g drained cheese, 3 basil leaves and 5 g oil. If your centre keeps getting wet, reduce sauce to 60 g before increasing the bake time. Extra sauce and cheese need not all go onto the pizza.
Equipment and setup
Use a gram scale, preferably a 0.01 g scale for yeast, an instant-read thermometer, a mixing bowl, a bench scraper and a lidded proofing box. Four individual food-safe containers around 750 ml also work. A pizza peel at least 30 cm wide makes launching much easier; a smaller turning peel helps in a pizza oven.
For a pizza oven, use an infrared thermometer suitable for its temperature range to read the actual baking floor. For a household oven, use a substantial baking steel or pizza stone and, if available, an overhead grill/broiler. Follow the equipment's temperature and clearance limits.
How to measure a tiny yeast dose
Do not estimate 0.30 g by eye or replace it with a teaspoon. If your scale only reads to 0.1 g, make a fresh dilution: mix 1.0 g instant yeast with 99.0 g of the recipe's water, stir thoroughly, then immediately weigh 30.0 g of that stirred suspension into the mixing bowl. It contains approximately 0.30 g yeast and 29.7 g water. Add 345.3 g plain water, or 345 g on a whole-gram kitchen scale, to complete the dough water. Discard the unused suspension; do not add it to the dough. Stir again immediately before taking the portion because yeast settles. A scale reading only whole grams is unreliable for the initial 1 g; use a finer scale for that measurement.
Instructions
1. Pick a schedule and measure the room
For a next-day dinner, begin at 18:00 on day one. Mix and knead until about 18:30, bulk-ferment until 20:30, then divide and ball by 20:40. Keep covered at 20°C until approximately 17:40 on day two. Start preheating around 16:40 and prepare toppings during that last hour. Shape and bake one pizza at a time from 17:40 onward; allow roughly 20–40 minutes for the four-pizza service in a pizza oven. The time estimate allows some extra preparation and handling.
Measure the temperature where the dough will actually sit, including overnight. A kitchen swinging from 18°C to 26°C is not a controlled 20°C environment. Above about 23°C / 73°F, use the refrigerator adaptation below. At 18–19°C, expect a slower proof and allow several extra hours if needed. Keep the box away from sunlight, radiators and an oven that is preheating.
The schedule is a starting point, not a guarantee to ignore the dough. Begin checking the balls several hours before dinner. Their readiness cues in step 5 take priority over the clock.
2. Mix from the water: about 5 minutes
Put the water in the bowl and dissolve the salt completely. Stir in roughly 60 g of the measured flour to make a thin slurry, then mix in the yeast or the measured yeast suspension. If using the suspension, add its 345.3 g plain-water allowance first, dissolve the salt and add the flour, then stir in the suspension.
Add the remaining measured flour in three additions, mixing and squeezing each in before the next. Scrape the sides and bottom so no dry pockets remain. The mixture should become one shaggy mass. Cover and leave for 10 minutes to hydrate. This short rest reduces the force needed during kneading.
3. Knead to a supple dough: about 8–12 minutes
Work on a clean, unfloured bench. Push the dough away with the heel of your hand, fold it back and rotate a quarter-turn. Use a scraper to gather sticky bits rather than adding flour. The dough should gradually become smooth, springy and only lightly tacky. If it fights you, cover it for another 5 minutes, then resume gently.
Stop when the surface is smooth and a small piece can stretch into a thin translucent membrane before tearing. It need not produce an enormous paper-thin windowpane. A rough dough that rips immediately needs more rest or kneading; a dough becoming hot, shiny and increasingly smeary needs a pause, not harder mixing.
Finished-dough target: 23–24°C / 73–75°F. Measure in the centre. Use cooler water next time if kneading overshoots this. If already above 26°C / 79°F, cover and cool briefly in the refrigerator, checking every 10–15 minutes, before continuing. Record flour, room, water and final dough temperatures so the next batch is repeatable. Do not add ice directly and assume it has all melted into the measured water.
A domestic dough-hook mixer is optional: mix on its recommended low dough speed, scrape down, rest, then knead in short intervals and check temperature. Stop on texture and temperature rather than copying a professional spiral-mixer time.
4. Bulk-ferment, then make four sealed balls
Gather into a ball, place in an ungreased bowl and cover so the surface cannot dry. Rest 2 hours at 20°C. Expect relaxation and some expansion; do not wait for doubling at this stage.
Scrape onto the bench without flattening. Weigh the whole dough and divide into four equal pieces, approximately 255 g each. Make clean cuts rather than tearing. Fold the outer edges of each piece underneath toward its centre, pinch the underside seam closed, then cup and draw the ball gently over the bare bench to create a smooth top. Stop as soon as the skin is taut; dragging until it tears weakens it.
Place seam-side down in a very lightly floured proofing box, leaving at least 5 cm between balls, or use individual containers. Close the lid. A loose towel alone can dry out overnight; the surface must stay supple without condensation dripping onto it.
5. Proof the balls until airy and relaxed
Leave covered at 20°C for about 21 hours, allowing 18–22 hours according to their development. Properly fermented balls spread outward, become visibly aerated and remain gently domed rather than collapsing into puddles. A lightly floured fingertip indentation returns slowly and incompletely. This test supports the visual cues; it does not measure fermentation by itself.
When lifted later with a scraper, a ready ball should stretch willingly while still holding together. A tight compact ball that springs back sharply needs more time. Very flattened, fragile balls with large bursting bubbles and almost no resistance have gone too far. If they become ready early, refrigerate them covered to slow further change; check again before shaping and allow any chilled dough to relax. Cooling does not reverse overproofing.
Do not knead, punch down or reball fully proofed dough immediately before baking. Reballing tightens it and redistributes its gas; it then needs several hours to relax again.
6. Drain cheese and prepare uncooked sauce
During the final hour, cut the fior di latte into strips approximately 5 mm thick and 3–4 cm long. Drain in a sieve over a bowl, covered in the refrigerator, for 1–2 hours, starting earlier if very wet. Blot gently, then weigh out 280 g. Buffalo mozzarella can be used, but it generally needs more attention to draining; keep the final topping weight the same.
Hand-crush the tomatoes into small soft pieces and mix with the sauce salt. If they are swimming in thin packing liquid, drain some off before weighing the 280 g. Keep enough juice that the sauce spreads easily. Do not cook it or purée it into foam. Taste before adding all the salt. This Margherita sauce needs neither garlic nor sugar.
Keep the cheese chilled until you portion it for assembly. Wash and dry the basil. Put the sauce, cheese and oil within easy reach: once a topped pizza is on the peel, speed matters.
7. Heat the baking surface completely
Pizza oven: preheat according to its manufacturer, commonly 30–60 minutes. For this dough, start with a measured floor temperature of 400–430°C / 752–806°F where the pizza will sit, with strong top heat. A traditional dome runs around 485°C / 905°F; a small gas oven's air dial does not necessarily measure its floor. Check multiple floor spots. Do not chase a 500°C floor, which can burn the base before the middle sets.
Household oven: put a steel or stone on a rack in the upper third, leaving the manufacturer's required gap below the broiler, commonly at least 15 cm / 6 inches. Preheat at 250–290°C / 480–550°F, whichever is the oven's rated maximum, for 45–60 minutes after switching it on. A hot oven light or thermostat signal alone does not mean a thick baking surface has stored enough heat. Use only stones rated for the intended broiler exposure. Continue with the household baking method in step 11.
8. Open the disc without pressing the rim
Lightly flour a clear area of bench. Dust the top of one ball, slide a floured scraper completely underneath and lift it out without pulling or folding it. Put it on the floured patch, briefly coat both faces and brush off loose flour. Leave the other balls covered.
With the pads of both hands, press gently from the centre outward, stopping 1.5–2 cm before the edge. Turn and repeat until the disc is about 18–20 cm wide. Keep fingertips off the border: that ring holds the gas for the cornicione. Do not use a rolling pin or squeeze a raised ring out of solid dough.
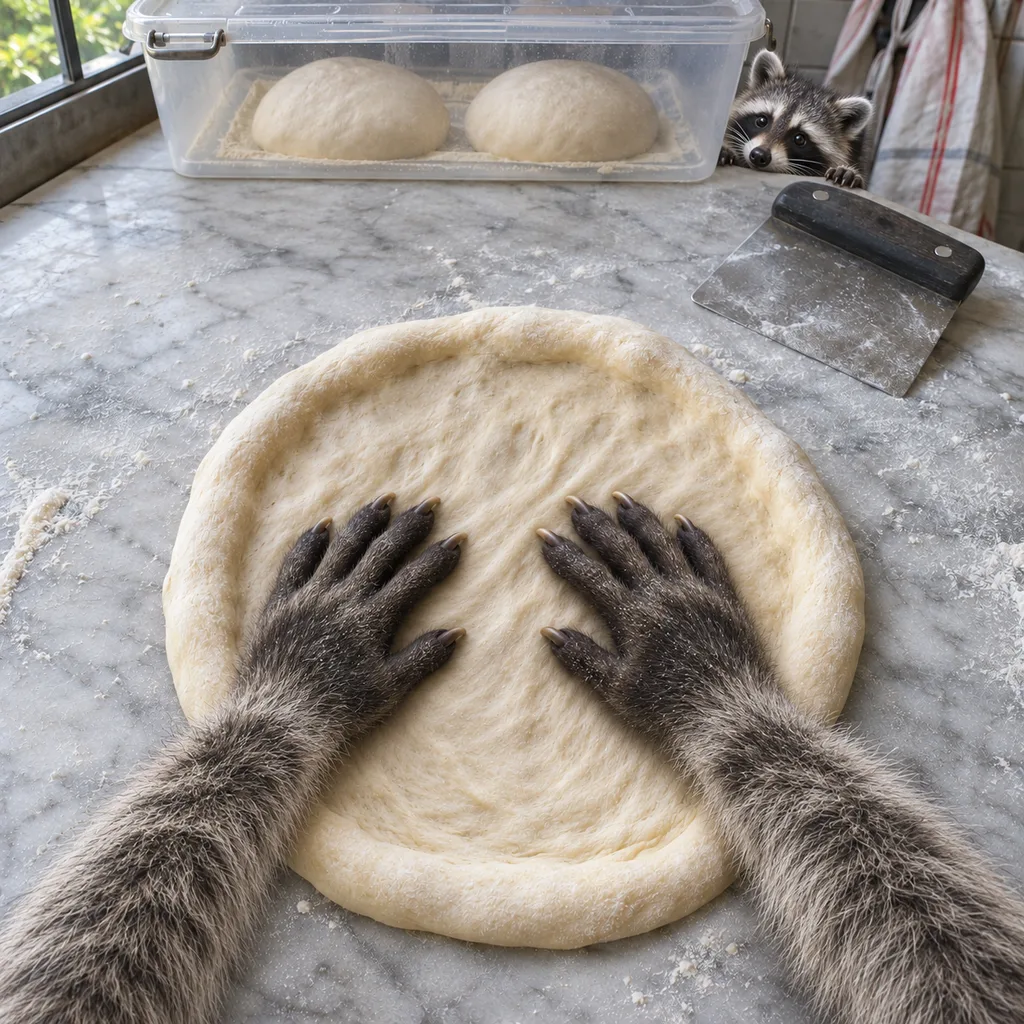
Lift the disc onto the backs of your hands with fingers curled under, support it near the inner edge of the rim, and rotate gently. Let gravity and a small separation of your hands stretch it evenly to 28–30 cm. Keep the centre supported and avoid sharp fingertips. Aim for a roughly 2–3 mm raw centre, without transparent holes, and an uncompressed border. A slightly smaller even pizza is better than a large disc with one paper-thin patch.
If it recoils, lay it down, cover and wait 5–10 minutes. Pulling harder creates tears. Pinch a small dry hole closed and dust lightly underneath before topping; do not pour sauce onto a tear.
9. Top lightly and check the peel
Dust a cool, completely dry peel very lightly with flour. Transfer the open disc onto it and gently restore its round shape. Give the peel a small horizontal shake: the whole disc should move. If it sticks, lift that edge and flick a little flour underneath, then test again. Flour is a release aid, not a thick bed that should burn under the pizza.
Spread 70 g tomato sauce in a thin spiral, leaving the border bare. Distribute 70 g drained fior di latte with gaps so tomato remains visible. Add 3 basil leaves and 5 g oil in a fine drizzle; a little oil over the leaves helps protect them. Use a clean rim and keep spilled sauce off the peel. Shake gently again and launch promptly, ideally within 30–60 seconds of topping.
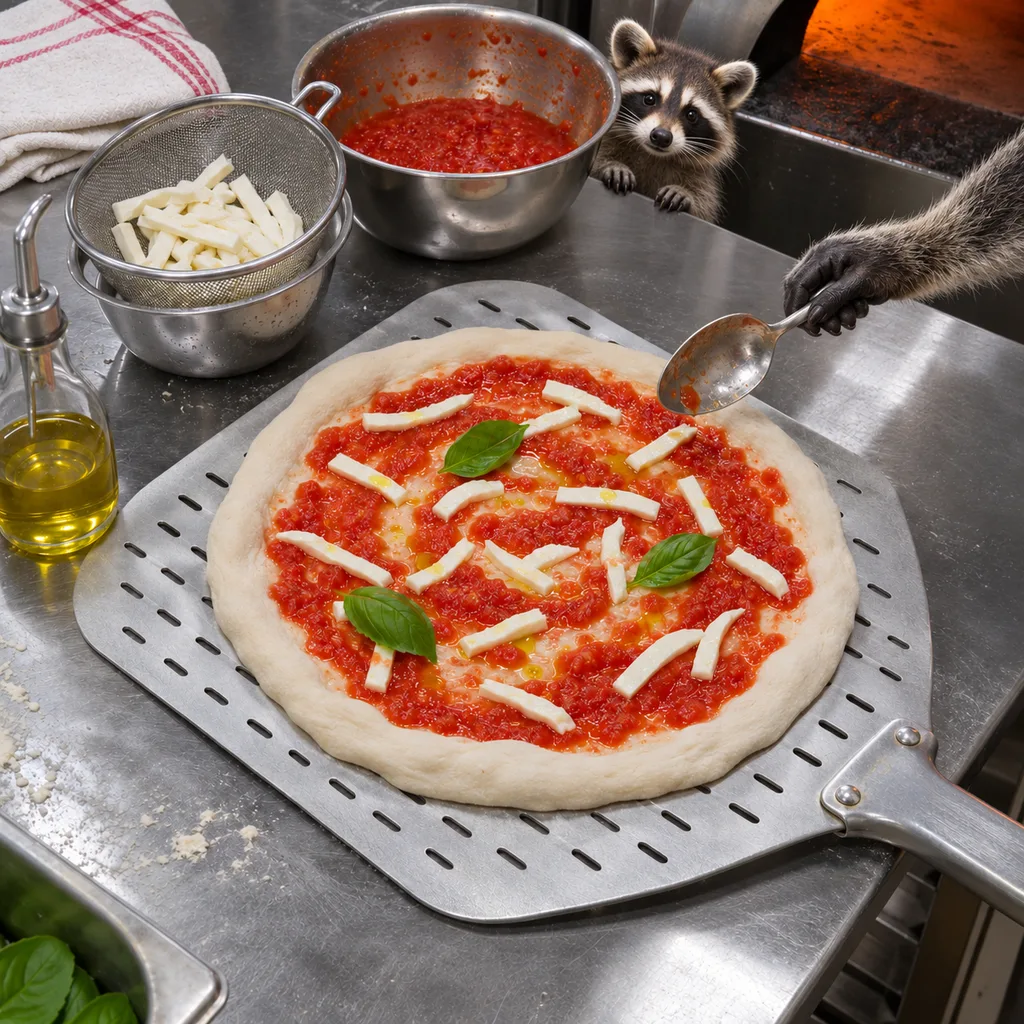
If one spot sticks, stop and free it on the bench; do not launch with a violent jerk. If sauce has leaked through a hole and glued it down, transfer to a lightly oiled pan and bake as a rescue pizza rather than spilling toppings onto the hot floor.
10. Bake in a pizza oven: about 60–90 seconds each
Bring the peel close to the floor and use a short forward movement followed by a smooth withdrawal to leave the pizza on the heated spot. Keep it clear of direct flame contact. Close the door only if the appliance's instructions call for it.
Let the base set for approximately 20–30 seconds before trying to turn it. Once the peel slides underneath without catching, turn a quarter-turn. Continue turning about every 15–20 seconds, watching the side nearest the flame. In a compact gas oven, reducing the flame after launch can help the centre cook before the rim burns; restore heat between pizzas. Adjust to the appliance rather than treating these seconds as fixed commands.
Start checking at 60 seconds. The rim should be expanded and golden with scattered brown-to-dark blisters, the cheese just melted and the sauce hot. Lift and inspect: the underside should have dry, light-brown mottling, not a blanket of black flour or a pale wet centre. A cut edge should show set bread rather than a shiny raw band. Give an underdone pizza another short interval, turning as needed.
If the top is done first, reduce top heat and let the base finish on the floor. If the base colours first, lower the floor temperature for the next pizza; briefly lifting the current pizza on a suitable metal peel can expose the top to heat without further floor contact, provided it stays well clear of the flame. Do not aim for uniform black spotting.
11. Household-oven alternative: about 6–10 minutes each
The same dough makes a good household-oven pizza, but the longer bake produces a firmer, drier crust than the short Neapolitan bake. Keep the disc nearer 28 cm for easier handling. Launch onto the fully preheated steel or stone and bake for 4–6 minutes, rotating if the oven has a strong hot spot, until the base is set and the rim has risen.
Inspect underneath with the peel. If the base is nearly done but the rim remains pale, switch to the overhead broiler for 30–90 seconds, watching continuously. If there is no broiler, continue on normal maximum heat until cooked, usually 6–10 minutes total. At a 250°C maximum or with a slow-heating stone, it may take longer. Use set dough and a browned underside as the endpoint rather than a colour chart or stopwatch. If the crust is drying while the bottom stays pale, improve the surface preheat before the next pizza.
For cheese that repeatedly overcooks, bake with sauce alone for the first 3–4 minutes, then add the measured cheese and finish. Add the basil after baking in this longer-bake variation. Return to normal maximum oven heat and allow 5–10 minutes of surface recovery between pizzas. Never use the self-clean cycle to increase cooking temperature.
12. Serve immediately and recover the floor
Let the pizza release steam on the peel or a rack for 15–30 seconds, then move to a plate and eat promptly. A long rack rest dries this style. Cut into the first pizza and check the centre while the oven recovers; that tells you more than the rim alone.
Before stretching the next ball, remove burnt loose flour with the oven manufacturer's suitable tool and check the floor temperature again. Restore it to the launch range. Bake and serve in succession rather than holding four pizzas in a warm oven, where their crusts lose the intended texture.
Refrigerator adaptation for a warmer kitchen
Choose this route before mixing if you cannot hold the main dough near 20°C. Keep flour, water and salt unchanged, but use 1.0 g instant yeast or 3.0 g fresh yeast, replacing the main yeast dose. Mix and knead to the same dough temperature, cover for 1 hour at 20–22°C, then divide and ball as above. Refrigerate immediately in covered containers for 18 hours at a verified 3–4°C / 37–39°F.
Bring the covered balls out for 4–6 hours at 20–22°C before shaping. Expect roughly 24–26 hours overall, including mixing and balling, and longer if the dough is still cold and tight. At 24–26°C, begin checking after 2 hours; do not automatically leave it out for the full six. Start preheating while the balls finish relaxing. They must be aerated and extensible, with the centre no longer fridge-cold. This is a domestic scheduling adaptation, not a claim to AVPN certification. Do not use the larger yeast dose with the main overnight room-temperature schedule.
Troubleshooting and refinements
| What you see | Likely cause | What to change |
|---|---|---|
| Dough springs back and resists stretching | Cold dough, insufficient final proof or overly strong flour | Rest covered for 10–20 minutes if already mature; give genuinely underproofed balls longer. Check dough temperature and flour specification. |
| Dough spreads into a sticky puddle and tears readily | Excess fermentation, too much heat or weak flour | Use gently at a smaller diameter if possible. Next time measure the proofing temperature, shorten the schedule or use the cold route. More bench flour will not rebuild its structure. |
| Little rise after an overnight proof | Inactive yeast, an inaccurate tiny dose or a room colder than measured | Verify the yeast and scale. Allow more time at the specified temperature; do not knead extra dry yeast into mature balls. |
| Dense rim despite an airy dough ball | Rim compressed during shaping, excessive handling or insufficient oven heat | Keep fingers inside the border, avoid a rolling pin and verify the floor temperature. |
| Wet centre or gummy layer under the topping | Wet cheese, excess sauce, a thick centre or an underheated floor | Drain and weigh cheese, reduce sauce to 60 g, stretch evenly and let the surface recover. A tender centre should still contain cooked bread. |
| Bitter black underside | Excess dusting flour or an overheated floor | Shake off loose flour, clean the floor and lower its temperature; do not compensate with more toppings. |
| Pale, dry household-oven crust | Slow bake or weak top heat | Preheat the steel thoroughly and use the broiler briefly if suitable. Consider the household-oven flour option on the next batch. |
| Pizza sticks during launch | Damp or warm peel, a sauce leak, or too long on the peel | Cool and dry the peel, test movement before and after topping, and assemble only when the oven is ready. |
About hydration: 60% is a deliberate starting point for easy opening and a fast bake. A wetter dough is not a quality score. Once the method is consistent, a flour that supports it can be tried at 62%, using 387.5 g water for the same 625 g flour. Change only that variable and keep notes. Do not add water to already proofed balls.
About preferments and long ageing: poolish, biga and sourdough can make excellent pizza, but each changes yeast activity, acidity and timing. They are separate formulas, not extras to add to this dough. Nor is a 72-hour fermentation automatically better for this flour and schedule. First make the direct method repeatable; then compare one change at a time.
For another pizza already in the collection, see Classic Margherita Pizza. For a Campanian dish using tomato and fior di latte with a different technique, try Gnocchi alla Sorrentina.
Sources and method notes
The regional style, direct-dough tradition and broad handling principles are grounded in the Associazione Verace Pizza Napoletana's international regulations. Its linked production specification, sections 2.1–2.3, distinguishes floor heat from dome heat and describes the characteristic brief bake. This recipe's batch weights, hand-kneading instructions, practical schedule and household adaptations are editorial working guidance rather than a certified production procedure.
Caputo's Pizzeria product specification supplies the named flour's strength and protein figures. Ooni's Neapolitan-style dough guidance provides a further equipment-maker example of relating room-temperature fermentation to dough temperature and a thoroughly heated pizza-oven floor. Yeast brands, flour batches and actual room temperatures vary, so this recipe gives observable endpoints alongside its weighed formula and planning times.
Estimated nutrition per serving
One serving is 1/4 of the recipe. Values are rounded estimates.
- Calories
- 840 kcal
- Protein
- 32 g
- Carbohydrate
- 124 g
- Fat
- 22 g
Calculated from USDA FoodData Central, SR Legacy (April 2018) food composition data and the stated recipe yield.
How this estimate was calculated
Ingredient amounts are converted to edible weights, matched to USDA foods, added together and divided by 4 servings. Comparable foods are used where a regional ingredient has no exact record. Ingredient brands, portion sizes, discarded fat and cooking losses can change the result. Optional ingredients and unmeasured accompaniments are excluded. Sodium is not estimated because salt and brine retention vary.
- Estimates the main room-temperature dough and all listed Margherita toppings, one whole pizza per serving; excludes optional method changes.
- USDA all-purpose white flour is a proxy for Italian 00 pizza flour; protein varies by flour. Includes 5 g retained dusting flour from the 20 g allowance.
- USDA whole-milk mozzarella is a proxy for drained fresh fior di latte; moisture and fat vary by product.
- Counts 280 g drained cheese and 20 g topping oil; discarded whey and unused dusting flour are excluded.